

Blood Link - You are somebody's type
Built using MongoDB, Express, React JS, and Node JS


What is Blood Link? 🩸
Blood Link is a platform to request and receive blood for FREE! Here we can raise a request or donate blood directly to the people in need. We just have to create an account and that's it, you are ready to request/ receive blood now!
Github Repo
Blood Link Website
Features:
- Create an account instantly by giving your basic details.
- Request Form to raise any blood request.
- Map View of the available donors at their exact location.
- List View to go through the available donors with ease.
- Live Feed to update the users about any events happening around them.
- Blood Requests section for donors to help those in need.
Motivation Behind the Idea 💡
Human life is a precious thing. And saving human life is the noblest thing that any human could do. I’ve always wanted to do my part in making this world a better place throughout my life. Ever since I turned 18, I have been donating my blood every 6 months. In India, about 12000 people die every day due to the sheer lack of donated blood. It was heartbreaking to learn that such deaths which could be easily prevented happened daily on such a scale. I wanted to do something to change this. But no matter how many times I donated blood, I couldn’t save all these lives, so what could I do as a college student to help those in need of blood. Then I came across an idea.
I have started learning HTML, CSS, and JavaScript to pursue Web Development the previous Summer. It was something that interested me after quite a long time. Using that knowledge, I thought of creating a website for helping the people in need of blood. A website where people can find donors nearby to help them out. A website with a Live Feed of people requesting blood so that people who want to help can register themselves and start helping them right away. And with a request form so that anyone who needs blood can instantly register themselves and find donors depending on blood type and city. This way, the website can help save lives and make it easier for families in a crisis to handle the situation better. The website would have contact details and links to share on social media to talk to the donors or share information directly.
The Start 👨💻
With a basic idea of the website in mind, I started working on the home page of the website. But as soon as I wrote the first few lines of code, I felt that I was missing something...
Yes! A cup of coffee ☕ and more importantly, a Logo! Then I opened Adobe Illustrator and few tabs on Chrome to start browsing through some ideas. I thought it would be better to make a logo from scratch rather than copying it from a random website.
And after half an hour of moving, transforming, and rotating vectors, I finally ended up with this! (Not bad right?)

Now with the logo in hand, it was time for the next part.
Building the Site 🕸
Learning React JS was one of the best things I've done in my life! Otherwise, I would've been stuck in JS hardcoding even the smallest of things. As they say
npm install anything
is all we need to implement even the complex features on the web! But it must be used wisely, or else you'll be finding yourself using npm for things you can do using one or two lines of HTML code! (did anyone say color picker?)
NavBar 🧭
So after knowing what all packages are available and what can be built using simple code, I started reading the documentation of react-router It was not my first experience with the router but this time I used it to my best. I haven't worked on websites consisting of more than two pages before so this was the first time I used react-router for its actual cause.
Within 30 minutes, the pretty-decent navbar was complete!
But then I opened the site on my mobile to witness a disaster! For those who don't know, you can open localhost:<PORT> in your mobile using your IP address (found by typing ipconfig in cmd) combined with the port number like <IP>:<PORT> (Ex: 192.123.0.456:3000), or you can simply open DevTools and click on the mobile icon beside the selector (highly recommended, especially when you are thinking of developing mobile-friendly sites, as positioning-errors come in different shapes and pixels) Then I thought of developing the website keeping the mobile-view in mind, as most people access a Blood Bank website using their phone.
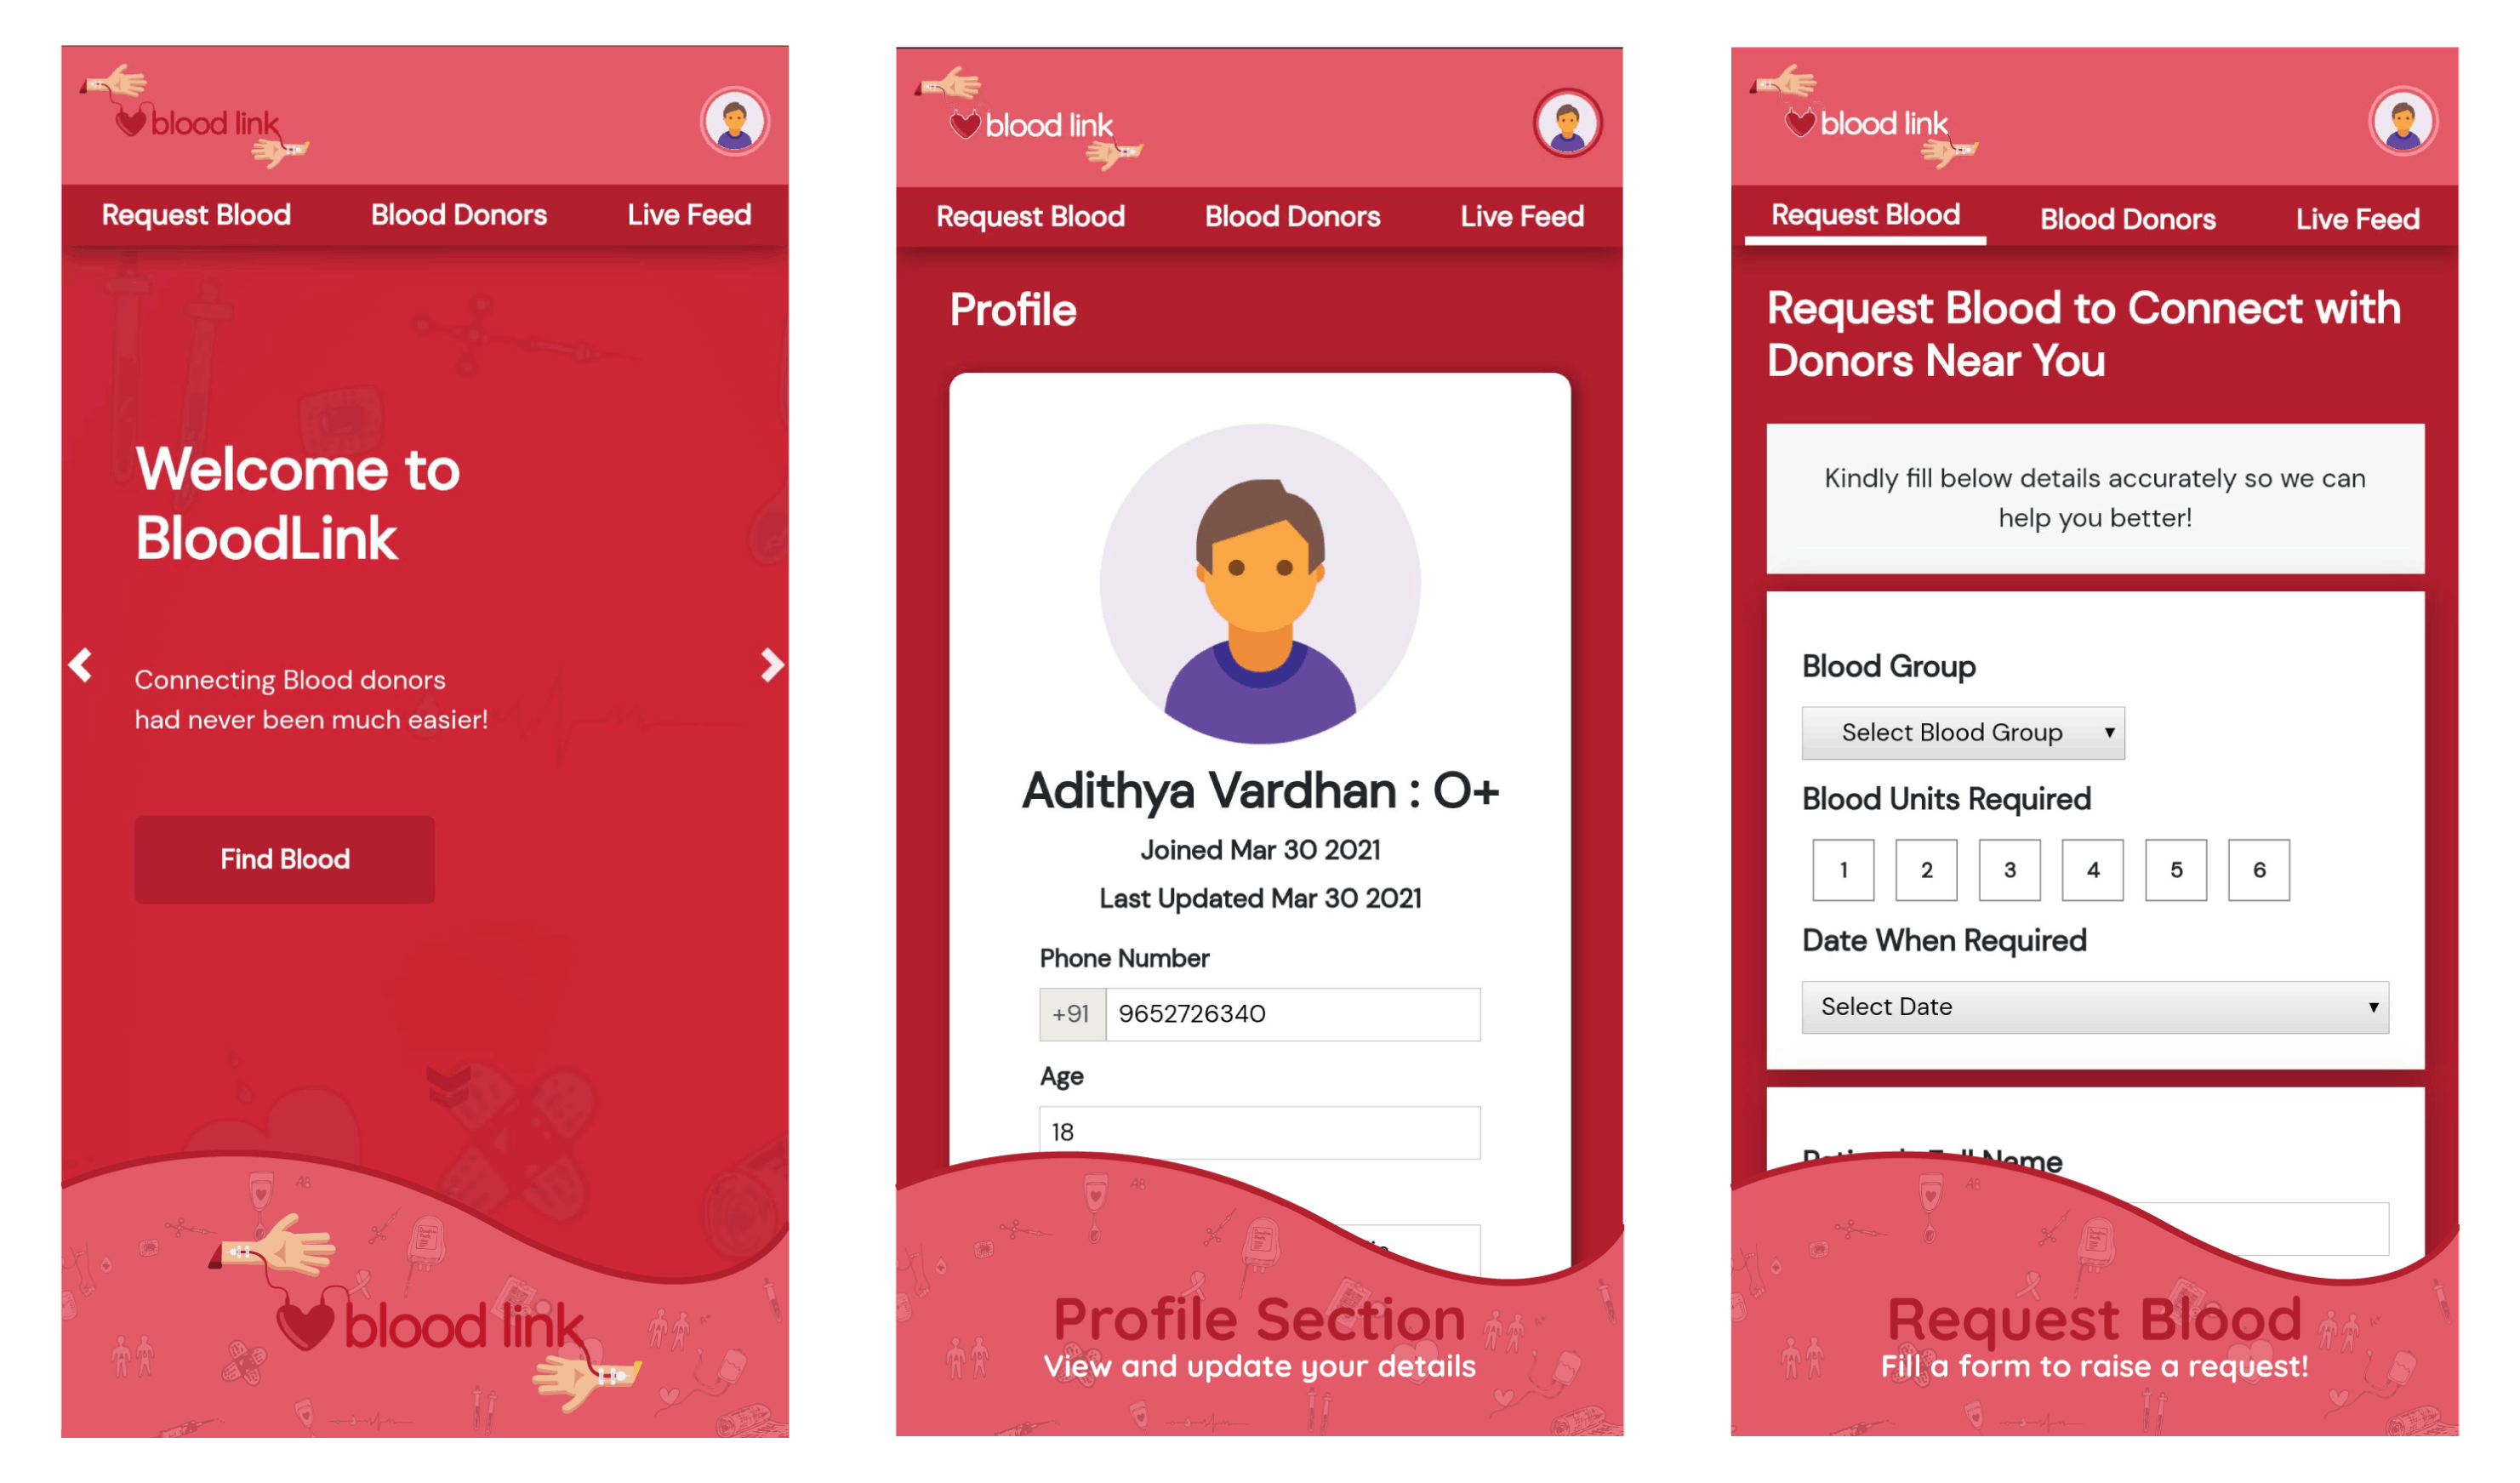
Home 🏠
I thought this would be simple to make. But it definitely wasn't! Not that it is difficult, as it doesn't involve any logic to be implemented, but the positioning of elements and deciding which animation to use for a particular button surely kept me thinking for long. This took 2 days to finish as I was way slower in the beginning than I am now! I'll cover the footer under this itself as I used the same one throughout. That was comparatively simple. Thanks to flexbox! (BTW, if you want to level up your flexbox skills, then FlexBox Froggy is an amazing place for it!
The whole idea of making a Home page first seemed weird to me, but I thought it was necessary so as to motivate the users and familiarize them with the website and its functionality. Thanks to the animate.css library I was able to animate few sections of the website with ease (say data-aos-easing="ease-in-out")! With few sections to scroll through both on big and small screens, I called a halt to the home page!
Login 🔐
This was simple, just a form with input fields asking your basic details and Blood Group. But the main challenge was fetching their location. At first, I tried asking their city, but it wasn't sufficient as all the marker pins on google maps get concentrated on the exact same location and cities have specific lat and long values which are not the same as the users' lat long most of the time!
Then I remembered the Navigator.geolocation property I used when I made a weather app long ago using an API.
Now came the second problem! Where to store the details after logging in? I don't have any idea of cookies and how they store information. But then came another idea which was the fruit of working on an open-source project called Sketchify (A clone of CodePen) which used the browser's local storage to store edited HTML, CSS, and JS files. That was enough for me to store the common state object (used redux for this) inside the local storage so as to remember the user without having them log in each time!
With Home, Login, and Navbar ready, it was time to start working on the main part of the website!
Requests Form 🧾
Simple copy pasting from Login Component (of course, changing the labels and state handlers) + Modifying the CSS took 4 hours of time to complete! It all felt so new and tiring as I was working with these after a long time. But that was just the beginning, Google Maps had, even more, to offer in the coming days!
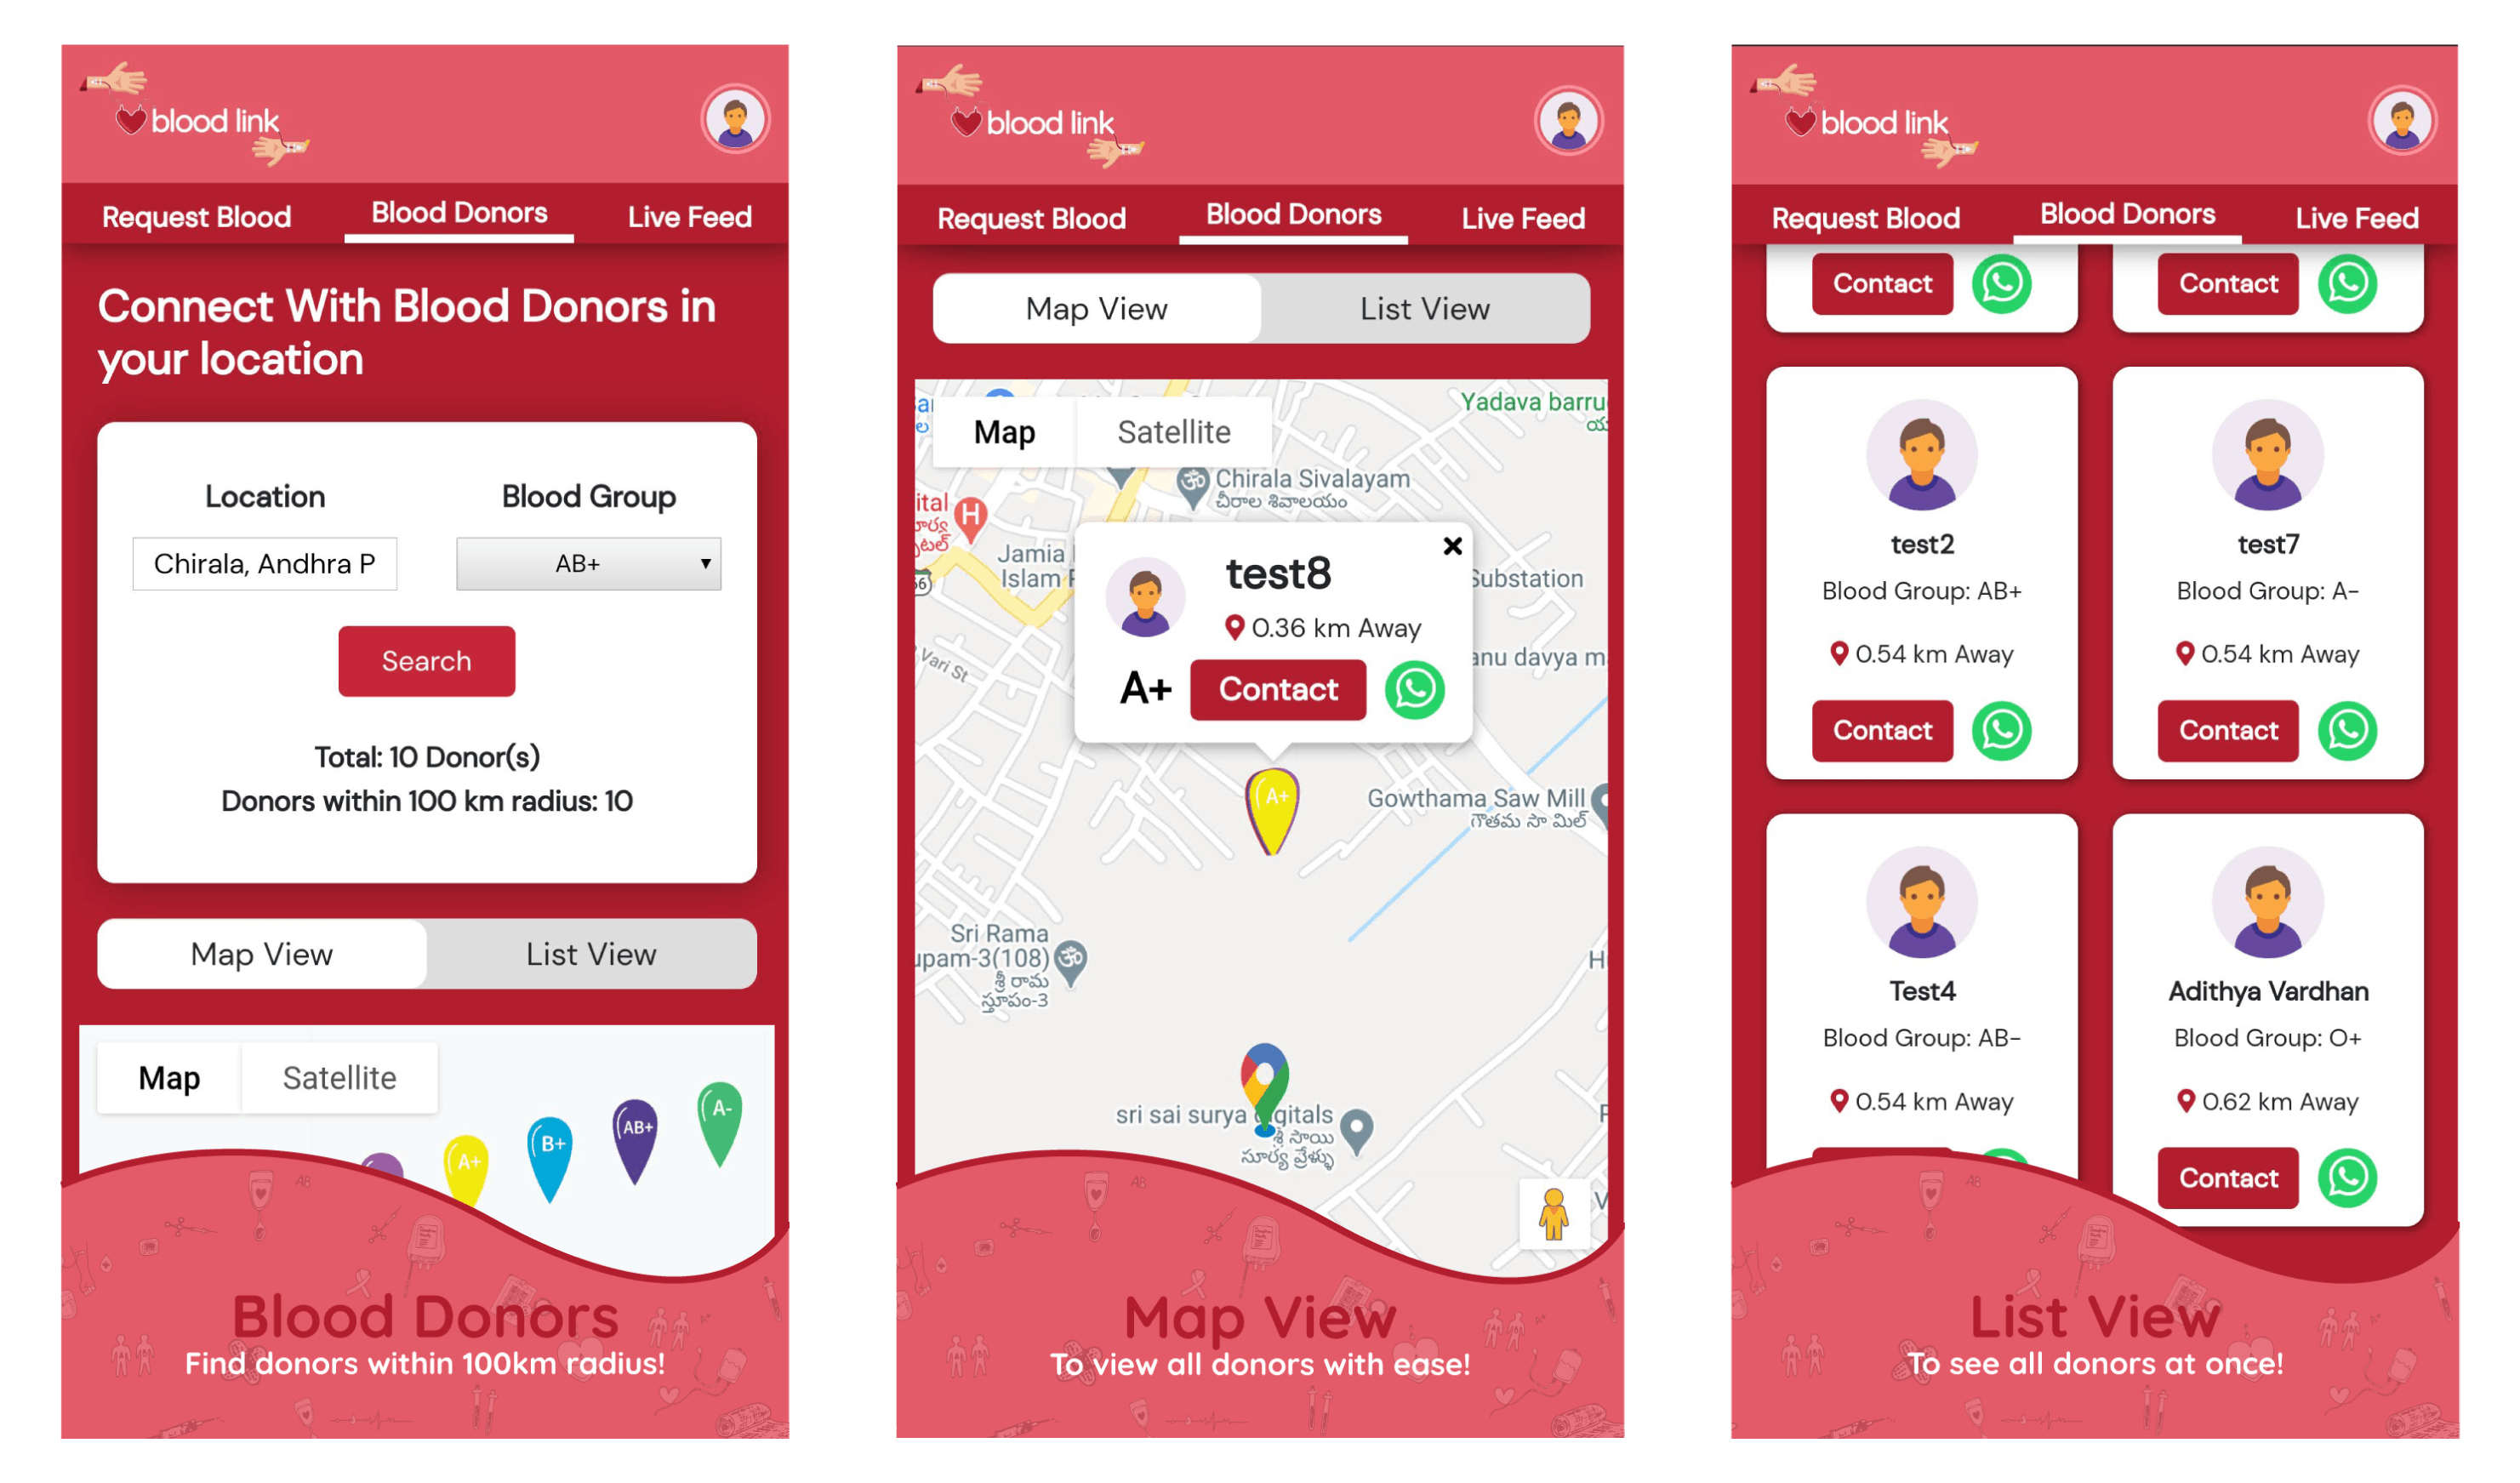
Blood Donors 🩸
The next component was <BloodDonors/> I thought of keeping it as simple and clean as possible as it was the main component of the website. To ensure that, I first made the UI on illustrator and started working further. TBH, this was the first time I made UI of a component before writing code. Usually, I try to arrange and style things on the fly as I write code depending on what suits the best (and of course, the easiest way possible)
So with the UI, I began building nested components one after another, then I finished all the basic things and it was now time to go through the Google Maps API before proceeding any further...
npm to the Rescue 🦸♂️
Without the need of going through all this, I came across a package react-google-maps that consists of all the major things, so it made things a lot easier for me to go through its tiny documentation (compared to Google Maps') and building a working prototype! Special thanks as always to random people posting questions on Stack Overflow 🙏
Now I had to design the InfoWindow on the map and List View of Donors.
Donors View 📱
With the map showing donors' location correctly, I had one more thing to do, arranging their info properly. Also, I thought of keeping an additional List View component so that it would be easier to shift and see a list of people ready to help rather than pinching the screen to see them. This kept me busy for another day as I was not able to give enough time because of assignments and tests 🔌
Finishing this made me feel so relieved but I was well aware that I was missing something... and it was something that cannot be ignored!
Well, it was the Back-end!! All the time I was playing around with an Array containing dummy data completely forgetting the fact that all these things are to be fetched from a database!
Choosing the Database 📚
I shouldn't say choosing, as MongoDB is the only database I know. But I thought of learning Firebase as a part of this project but backed off due to lack of time. But MongoDB isn't bad. I came to know the geo-features this time as I had to fetch the users within a 100km radius. (Tip: If you're considering using this feature, be sure to add the location index to enable it!)
MongoDB Atlas is love. Change my mind! The fact that it was so simple to create a CRUD Application just blew my mind! This increased my confidence in backend development as I never wrote this much code in the server folder! Also, special thanks to the Postman who played a cameo in between (otherwise I would have suffered from Insomnia 😉) And when it comes to fetching data in front-end... Axios is my favorite!
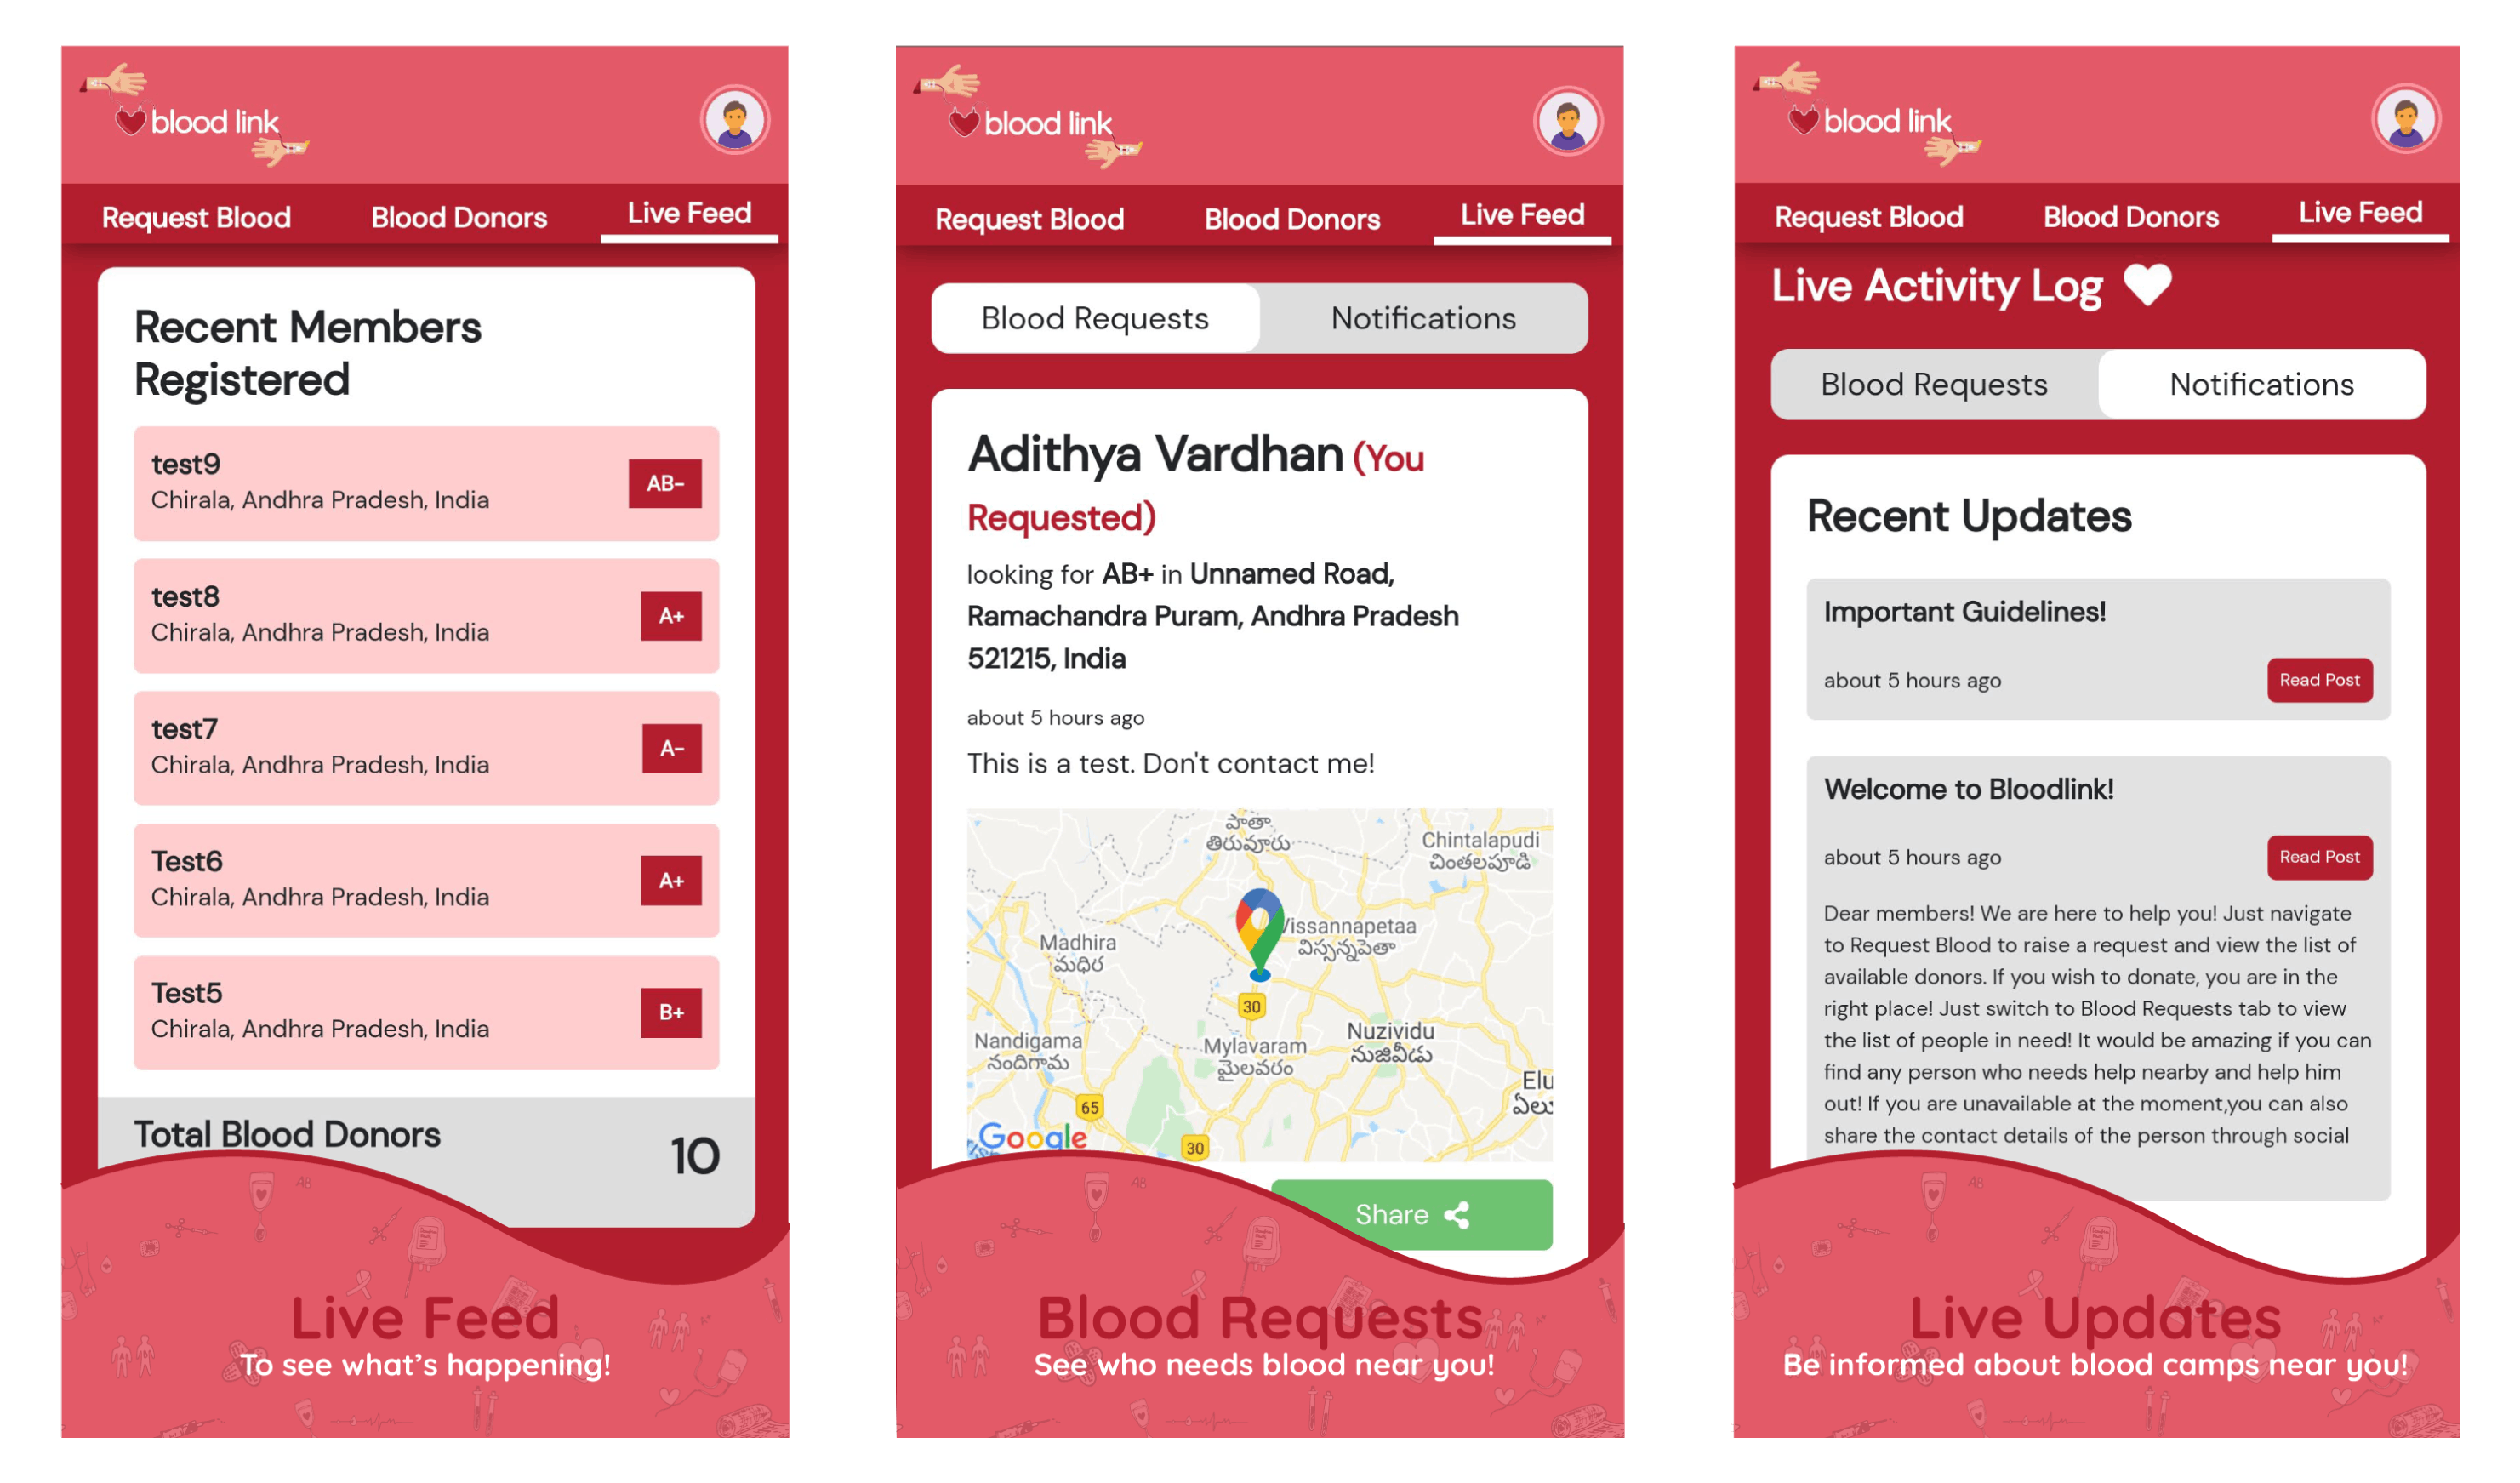
Live Feed 📶
Now with the database up and ready, I had to write some more methods to fetch data and display it to the users! And after that, arrange the content neatly so that it appears good on both big and small screens! CSS can feel tricky and painful at times, but it gives life to our projects! This project has surely leveled up my CSS Flexbox skills as previously I only used it for centering purposes! (Anything goes left? Try margin: 0 auto and if things don't go your way, apply flex on the element's parent and two more lines saying align-items: center and justify-content: center and voila! the element is centered now!)
Now with everything ready, I had to get feedback and test it myself for some bugs!
After going through the website! I came to know that it would be better if we can include a profile section with an additional feature of updating/modifying user information as it can affect the website's database (a user shifting from one city to another)
Profile 👥
Aah! It is always stressful to work on an additional component that you aren't prepared for. In the same way, it is equally exciting to work with React playing with the state using manipulation techniques. After three hours of focussed programming, the profile section was ready!!!
This marked the end of the development process! Up next: Deployment!!
Deploying the Website 🚀
This used to be the hardest part for me until I started working on hosting websites on Nginx servers recently. The whole process of deploying an app seems much easier after going through the terrible lines of code in nginx.conf! Trust me, writing heroku-postbuild in package.json is far better! Not to mention the hours of work needed to get an SSL certificate installed on your server! Thanks to Heroku (and YouTube for those tutorials), my website was finally deployed with ease!
Screenshots of the Website UI:
Creator 🧠
Adithya Vardhan (Sophomore at BITS Pilani)
- Github: github.com/im-adithya
- Linkedin: linkedin.com/in/adithyavardhan
I would like to thank Hashnode and ACM BITS Pilani for providing me an opportunity to display my efforts. It was surely an amazing learning experience for me. Until next time! 👊